When a food trailer is shipped for export, some axle parts or wheels may be packed separately to make transportation safer and easier. After the trailer arrives, the buyer may need to install the axle, leaf spring plates, U shaped brackets, washers, bolts, and wheels before using the food trailer.
This guide explains how to install a food trailer axle with fenders step by step. It is written for food trailer owners, concession trailer buyers, and mobile kitchen trailer operators who want a clear and practical installation process.
As a China food trailer factory, ZZKNOWN manufactures high quality food trailers, concession trailers, mobile kitchen trailers, refrigerated trailers, container shops, and restroom trailers for customers in the USA, Europe, Australia, and other markets. For customized food trailers, correct axle installation is very important because it affects trailer balance, wheel position, and safe movement.
Before you start, place the food trailer on flat ground and make sure the trailer body is stable. It is better to arrange at least two people for this job because the axle is heavy and needs to be lifted and adjusted from both sides.
Basic tools and parts usually include the following.
| Item | Purpose |
|---|---|
| Yellow fittings | Installed on the trailer holes and leaf spring plates |
| Black threaded rods | Used to connect the moving parts and spring plate positions |
| Washers | Placed before and after each hole to protect the connection point |
| Leaf spring plates | Support the axle and absorb road vibration |
| U shaped brackets | Lock the axle and leaf spring assembly together |
| Nuts and bolts | Used to fix each connection point |
| Wrench | Used for final tightening |
| Tires | Installed after the axle is correctly fixed |
Do not fully tighten every bolt at the beginning. Keep some parts slightly loose during alignment. This makes the later axle adjustment much easier.
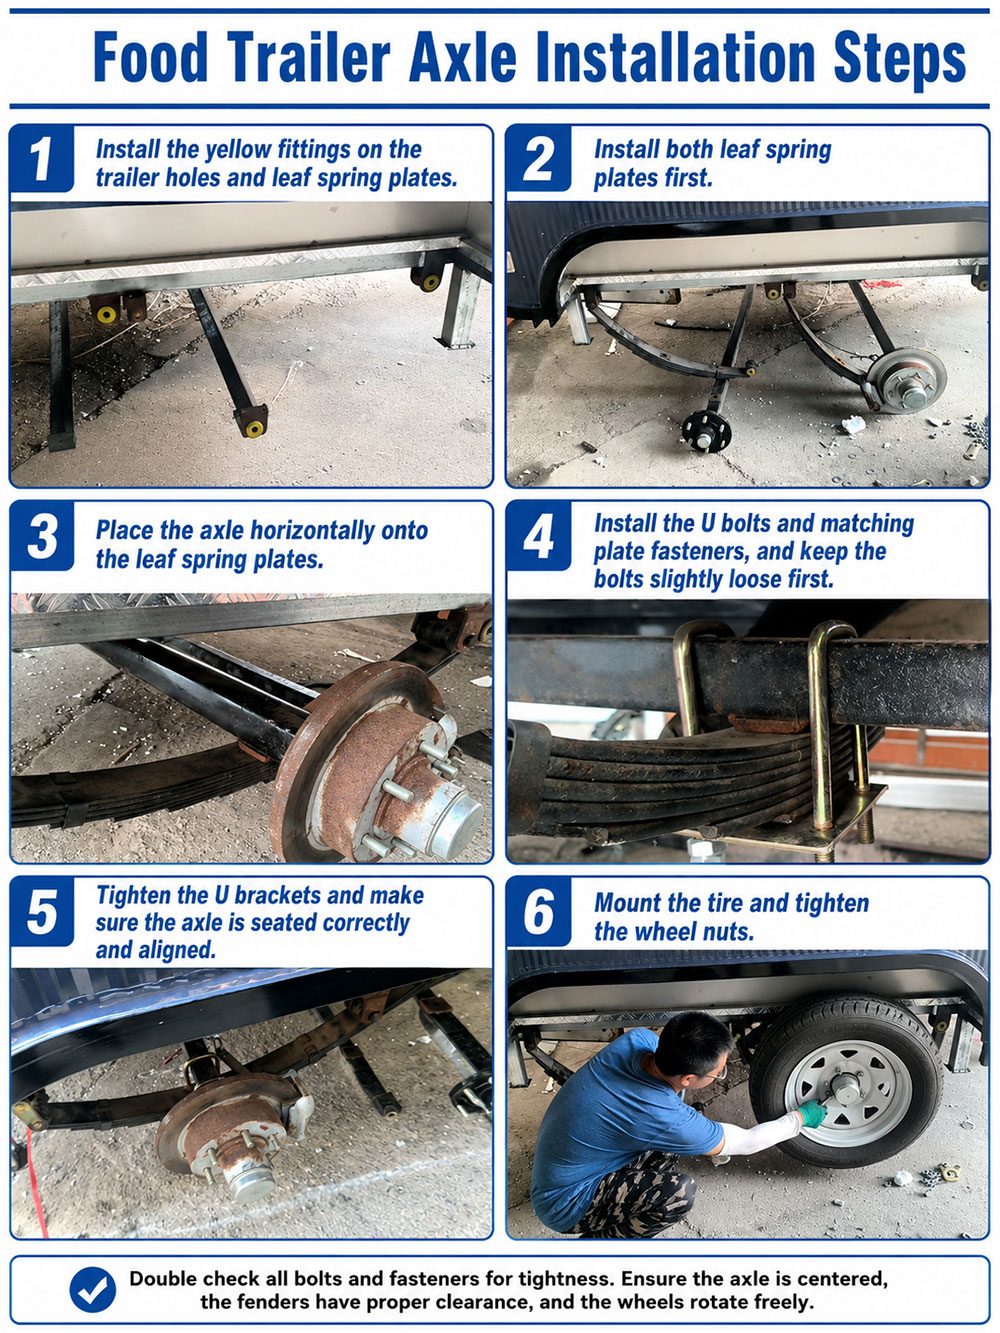
The first preparation step is to install the yellow fittings.
Install the yellow fittings into the matching holes on the food trailer body. Then install the same type of yellow fittings onto the corresponding positions of the leaf spring plates.
These yellow fittings help the spring plate and frame connection sit in the correct position. Make sure the fittings are pushed into the correct holes and are not tilted.
The black threaded rods should be placed in the connection positions between the movable fittings, washers, trailer frame, and leaf spring plates.
The correct method is simple.
First place a washer on the movable fitting. Then pass the fitting through the correct hole position. A washer should be used on both sides of the hole. The upper hole connects to the trailer body position, and the lower hole connects to the leaf spring plate.
This step is important because washers help spread the pressure and reduce wear around the hole. For a food trailer axle, small alignment details can affect the final wheel position.
When installing the leaf spring plate, it is recommended to install the position with one black threaded rod first.
This position is easier to control and can save time for the next steps. After this point is connected, the rest of the spring plate can be adjusted more smoothly.
It is not recommended to install the rear position first because it usually requires more force and makes the later operation harder. In real installation work, starting from the easier control point helps avoid repeated adjustment.
Before rolling the axle into position, install the two leaf spring plates on one side first. The leaf spring plates should be connected to the trailer frame but should still have some movement for final alignment.
At this stage, the parts should look roughly assembled, but not fully tightened.
This is normal. A little movement is needed because the axle must be positioned between the leaf spring plates later.
After the first black threaded rod position is installed, roll the axle into the correct position under the food trailer.
Pay attention to the bolt position on the leaf spring plate. The axle has matching bolt holes or locating points. These must be aligned and locked into the correct position.
The axle should sit in the middle of the leaf spring plate area. Do not let the axle sit too far forward or backward.
After the axle is in place, install the fittings according to the same washer and bolt method.
Connect the fittings and leaf spring plates together. Screw on the nuts, but do not tighten them too much at this stage.
Keep checking that the axle remains in the middle of the spring plates. If the axle is not centered, the wheel may not line up correctly with the fender, which can cause rubbing or uneven trailer movement.
Arrange one person on each side of the trailer. Lift the axle slightly and shake the axle and leaf spring plates back and forth.
When the axle drops into the correct position, you may hear a clear seating sound. At the same time, the axle should feel stable without obvious looseness.
This step is useful because sometimes the axle may look aligned but has not fully dropped into the correct locating position. A small shake can help the parts settle properly before final tightening.
After the axle is seated correctly, place the two U shaped brackets around the axle and leaf spring assembly.
Then place the matching plate under the corresponding holes. Each hole should be matched with two nuts or the correct fastening parts supplied with the trailer.
Start by tightening the nuts by hand. After all nuts are correctly threaded, use a wrench to tighten them evenly.
Do not tighten one side completely before the other side is aligned. Tighten gradually so the pressure is balanced.
After the axle, leaf spring plates, black threaded rods, yellow fittings, washers, and U shaped brackets are all correctly positioned, use a wrench to tighten all bolts.
Check every connection point carefully.
| Check Point | What To Confirm |
|---|---|
| Yellow fittings | Installed in the correct holes |
| Washers | Placed before and after the hole |
| Leaf spring plates | Not twisted or misaligned |
| Axle position | Centered on the spring plate |
| U shaped brackets | Evenly tightened |
| Nuts | Fully secured with a wrench |
| Fender clearance | Wheel area has enough space |
A good habit is to check each side twice before installing the wheels.
After the axle is fixed, lift the tire and align the wheel holes with the axle studs.
Hang the tire onto the axle. Then install the nuts onto the exposed threaded studs. Tighten the nuts by hand first, then use a wrench to secure them.
After the tire is installed, check that it sits straight and does not touch the fender. The front axle and rear axle use the same installation method. Repeat the same steps until all axles and tires are installed.
The most common mistake is tightening all bolts too early. If the bolts are fully tightened before the axle is centered, it becomes difficult to adjust the position later.
Another common mistake is forgetting washers. Washers should be used before and after the hole where required. This protects the connection point and helps the parts fit more securely.
You should also avoid installing the harder rear position first when working on the leaf spring plate. Starting from the black threaded rod position shown first makes the process smoother and less labor intensive.
From actual food trailer assembly experience, the easiest method is to complete the basic leaf spring plate installation first, then roll the axle into position, and finally install the U shaped brackets.
One successful case was a customer who installed the front axle first and kept all nuts slightly loose during alignment. The axle dropped into position quickly, and the tires lined up well with the fenders.
One failed case was caused by tightening the spring plate too early. The axle could not sit into the correct locating point, so the customer had to loosen several bolts and repeat the alignment. This added extra time and effort.
The lesson is simple. Align first, tighten later.
A food trailer carries cooking equipment, water tanks, refrigerators, generators, and sometimes heavy stainless steel counters. The axle supports the trailer load and helps keep the trailer stable during movement.
If the axle is not installed correctly, the trailer may have uneven wheel clearance, poor balance, or abnormal shaking. For a concession trailer or mobile kitchen trailer, this may affect transportation safety and long term use.
That is why professional food trailer factories pay close attention to axle position, spring plate alignment, and wheel clearance before delivery.
It is not recommended. The axle is heavy, and both sides need to be lifted and adjusted. Two people make the job safer and faster.
No. It is better to tighten the nuts by hand first and keep the parts adjustable. Final tightening should be done after the axle is correctly seated.
Check whether the leaf spring plate bolts are aligned with the axle holes. You may need to slightly shake or adjust the axle until it drops into the correct position.
Washers help protect the hole area and make the connection more stable. They also help reduce direct metal wear during trailer movement.
The installation method is the same. After finishing one axle, repeat the same process for the remaining axle and tires.
Yes. ZZKNOWN can customize food trailer layouts, axle structures, fenders, tires, kitchens, water systems, electrical systems, and local standard configurations for global buyers.
Installing a food trailer axle with fenders is not difficult if you follow the correct order. Prepare the yellow fittings, washers, black threaded rods, spring plates, axle, U shaped brackets, and tires first. Install the spring plates before rolling in the axle. Keep the nuts slightly loose during alignment, then tighten everything after the axle is fully seated.
For buyers who need a customized food trailer, concession trailer, mobile kitchen trailer, or food truck trailer, a reliable factory design and correct installation guidance can make the setup process much easier.